How to Read Crochet Patterns for Dummies
A crochet diagram consists of symbols, 1 symbol = 1 stitch (or a group of stitches) - the symbol definition explains what kind of run up it is/how it is worked. The diagram shows all stitches seen from the correct side (unless otherwise specified).
A typical crochet diagram looks like this:
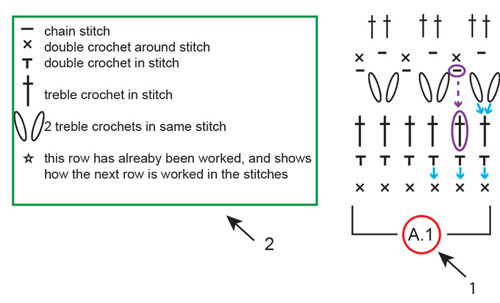
1: one. A.1 is the name of the diagram and refers to the entire diagram - within the square brackets. Everything inside the foursquare brackets is 1 repeat of the diagram.
2: two. This is the symbol definition, which explains how each symbol is worked.
Blue arrows: The symbol is worked in or around the stitch direct below itself in the diagram. Sometimes multiple stitches are worked in/around the aforementioned stitch.
Purple ovals and arrows: Not all stitches are worked in, for example: sometimes yous work a concatenation sew and the stitch below is skipped.
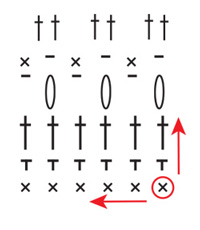
A crochet diagram is read opposite to how you would ordinarily read: from correct to left, from bottom to top. In other words: you lot first with the symbol in the bottom right corner, and work your mode leftwards and upwards (see Ruby in diagram below).
If you are supposed to work several repeats of a diagram (ie: if it is to be repeated several times on the row/round), work until the end of the row of the diagram and begin again with the first symbol on the row.
Back and along:
When y'all're working dorsum and forth every other row is worked from the right side and every other row is worked from the incorrect side. When working from the incorrect side the diagram has to be read the opposite way: from left to correct (see blood-red arrow from right side, and bluish arrow from wrong side below).
The row typically starts with a given number of chain stitches - the number equals the height of the following sew, and are included to ensure you are starting from the top of the following sew (see green circles below). If the chain stitches are included in the diagram (as in this instance) all stitches are worked exactly as they appear. Sometimes the pattern includes CROCHET INFORMATION at the peak of the instructions, which tells y'all how many chain stitches to work at the offset of every row, and whether these concatenation stitches are replacing the kickoff stitch on row (or in addition). If the concatenation stitches are Non included in the diagram: follow instructions under CROCHET Information.

In the round:
When working in the round, all rounds are worked from the right side: from right to left (see crimson arrows beneath). How the round begins and ends are often displayed in a diagram of its own (see A.ii beneath - dark-green square). Like to when working dorsum and forth, the round starts with a given number of chain stitches, equal to the height of the following sew together. At the end of the circular you typically bring together the first and finish of the round with a slip stitch in the terminal of the chain stitches at the beginning (see bluish square below). In other words: the chain stitches in A.2 = the beginning of the round, while the slip stitch in A.2 = the finish of the round.
If you are supposed to work several repeats of the diagram (A.one) (ie, it is repeated several times on the round) you work until the last stitch, then begin over again with the first run up on the same row in A.1. NOTE: in this case it is But A.1 that is repeated, A.2 shows how the beginning and end of the entire round is worked.

Several different diagrams worked consecutively on the row/round:
If you're working several unlike diagrams later on each other on the aforementioned row/round, work as follows: Work 1st row in diagram 1, go along with 1st row in diagram 2, then 1st row in diagram 3 etc. Retrieve: if you're working back and forth, the diagrams will take to exist worked in the contrary order from the wrong side - ie: commencement with diagram 3, then diagram 2 and lastly diagram ane. They are also worked the opposite way, as usual.

Circular diagrams:
When working in a circumvolve, ie y'all starting time in the middle and work your fashion outwards, this will often be displayed in a circular diagram. The diagram can either display the entire circle - in this case every symbol is worked exactly as it appears, or the diagram can display a fraction of a circumvolve which is then repeated a given number of times to make a full circumvolve.
Full circle:
In a full circumvolve diagram you begin with the symbol in the middle of the circle: typically a small circle representing a given number of concatenation stitches, fabricated into a ring with a slip stitch (see red circle below). Similar to when working in the round, the round begins with a given number of concatenation stitches (equal to the pinnacle of the next symbol) and ends with a slip sew together in the concluding of these chain stitches - ie: equivalent to A.2 in our previous case (meet blueish square) - NOTE: when the chain stitches are displayed in the diagram these do Not supervene upon any of the other symbols, and every symbol is worked exactly as they appear. If the concatenation stitches ARE replacing whatsoever stitch, this will take been removed from the diagram.
You work counter-clockwise: from correct to left, one symbol afterward the other (see red arrow below). The stitches on the first round are typically worked Effectually the chain stitch ring, meaning yous put the crochet hook THROUGH the eye of the chain stitch ring, selection upwards the strand and pull it back through the ring (working the stitch as usual) - Y'all are not working the stitch IN any of the concatenation stitches, but rather Around the concatenation stitch band. At the terminate of the round, bring together the beginning and end with a slip stitch, and start with the second round in the diagram: the second closest to the middle (se green arrow).

Fraction of a circle:
If the diagram is merely a fraction of a circumvolve, this is because the fraction is repeated a given number of times in the round, to make a total circle. You begin with the symbol at the lesser (see red circumvolve) and work the same way every bit for Total CIRCLE, but A.2 will be repeated a given number of times in the circular. Like to when working in the round there is typically a separate diagram illustrating how the round begins and ends (encounter A.1, blue square below). You begin with the diagram row closest to the chain stitch ring at the bottom, work the concatenation run up(es) in A.1, then work the symbol(s) in A.2 (in the first round information technology is only 1 symbol) and repeat the symbol(southward) in A.2 the number of times stated in the pattern.
At the stop of the round you join the round with the slip stitch in A.one. When the first round is completed, proceed with the side by side round: second closest to the chain run up ring (meet green arrow below).

Square diagrams / colour diagrams:
Some crochet diagrams are displayed in a square diagram, where i square = ane stitch. What type of stitch is worked will typically be explained in the design instructions, while the purpose of the diagram is to display what colours the stitches are worked in (see ruby circle below = symbol definition).
Y'all work equally explained higher up, depending on whether you work Dorsum AND Forth, IN THE Circular or a Round DIAGRAM.

Comments (77)
![]() Chantal Garcès wrote:
Chantal Garcès wrote:
Bonjour, Pouvez vous 1000'écrire le schéma A.1 et A.ii du modèle DROPS Baby 29-3 car je ne les comprends pas. Mer i beaucoup.
21.02.2022 - 15:57:
![]() Cécile Rousseau wrote:
Cécile Rousseau wrote:
Dans DROPS 211-28 Eco Tote by DROPS Design\r\nSac crocheté en point ajouré et groupes de brides en DROPS Bomull-Lin ou DROPS Paris.\r\nJe ne comprends pas le diagramme A.2\r\nSerait-il possible de me l\'écrire en texte.\r\nJe vous remercie pour votre aide.
13.02.2022 - 23:xiv:
DROPS Pattern answered:
Le diagramme A.ii se crochète sur iv brides: au 1er tour (et tous les tours impairs), crochetez: *4 mailles en l'air (=2ème symbole), puis sautez 3 brides et crochetez 1 bride dans la bride suivante/autour de la maille en l'air suivante (à partir du tour iii)*, répétez de *-* tout le tour. Au 2ème tour (et tous les tours pairs), crochetez *3 brides dans l'arceau, one maille en 50'air*, répétez de *-* tout le tour - commencez et terminez les tours comme indiqué dans A.1 = 5ème symbole. Bon crochet!
xiv.02.2022 - 11:29:
![]() Lauren wrote:
Lauren wrote:
Hello! I was wondering if the "how to read crochet diagrams" is written in British English or American English? I just want to brand certain since I'm following your "Evening in Paris" design in American English and I want to make sure I'thousand following the diagram key correctly.
12.02.2022 - 03:00:
DROPS Design answered:
Dear Lauren, the lesson is written for both languages. In any example, if you lot are post-obit a pattern, you have the primal for the symbols in the diagram in whichever language y'all take chosen, so yous will be able to follow the pattern correctly. Happy crochetting!
xiii.02.2022 - 18:13:
![]() Monica Hedén wrote:
Monica Hedén wrote:
Hej! Ska virka sjalen Lampone modell fl-004. På första varvet i A2 ser det ut som att 10 luftmaskor hänger i luften. ska de inte bindas ihop med varvet före? mvh Monica
08.02.2022 - 09:45:
DROPS Design answered:
Hej Monica, skica gärna frågan inne på mönstret, så ser vi hur det ser ut och det blir lättare att hjälpa dig :)
09.02.2022 - 13:xxx:
![]() Eliis wrote:
Eliis wrote:
Tere! Kas eesti keelset heegeldamis silmuste tähendusi (+õpetust kuidas see käib) on teil? Mul on plaanis heegeldada linik, kuid osad silmused on täiesti tundmatud (või lihtsalt ei mäleta).
28.12.2021 - fourteen:18:
![]() Karin wrote:
Karin wrote:
When then say piece of work 1st row in A1 , then first row in A2......etc. Does information technology mean i repeat the symbols of the first row of A1 for the whole row So echo the the symbols of the beginning row of A2 for the whole row of row ii on my garment? Or do i but do the ii,3,or four symbols that are shown on the diagram of A1 then carry on with the symbols shown on A2 diagram ,so reapeat A1 and A2 over and over till finish of row ?
27.11.2021 - 08:24:
DROPS Design answered:
Dear Karin, if¡northward the case, A.ii shows how to begin (with chain stitches) and end the row/round (the bluish rectangle) and A.ane is worked repeating the same symbols on the round/row. In well-nigh patterns, they volition specify if you need to repeat the diagram the whole circular/ row or simply in one case in the row/circular. Happy crochetting!
28.11.2021 - 18:05:
![]() Karin wrote:
Karin wrote:
Is each each row of the diagram a unlike row ? When only two symbols are showed do i repeat thise 2 for the whole row? If 4 symbols are shown do i do each symbol then echo information technology over and over to finish of row ? When they say do A1 then A2 ............exercise i do the symbols of A1 for the whole row ...then the symbols of A2 for the whole of the next row ? Does 1 row of symbols represent one row ?
27.11.2021 - 08:05:
DROPS Pattern answered:
Dear Karin, information technology might be a good idea to inquire your question in the "question" section of the pattern you are working on, our answer could be more relevant. Thanks for your comprehension.
29.11.2021 - 09:xvi:
![]() Cathy Coffey wrote:
Cathy Coffey wrote:
What does it mean to "double crochet around concatenation sew together"? Does information technology mean to double crochet in the chain space?
27.10.2021 - 00:45:
DROPS Design answered:
Dearest Cathy, yes, you need to make a double crochet inside the concatenation space, and not the chain stitch. Happy crochetting!
31.10.2021 - 18:46:
![]() Margo Hulst wrote:
Margo Hulst wrote:
Begrijp niet hoe je 2 voor panden voor vest in de zelfde richting (beneden naar boven) kan haken.
thirty.08.2021 - 21:xl:
DROPS Design answered:
Dag Margo,
Je begint onderaan met opzetten, dan haak je heen en weer volgens het telpatroon, gaandeweg haak je dus naar boven. Bij het linker pand zit de bies (als er een bies aan zit) aan de rechter kant, bij het rechter pand zit de bies aan de linker kant. In principe zou in de beschrijving van het patroon duidelijk moeten zijn aangegeven hoe je de panden breit.
Je kan trouwens ook een vraag posten bij het betreffende patroon.
23.ten.2021 - 18:fifteen:
![]() Annette Sørensen wrote:
Annette Sørensen wrote:
Jeg hækler 152-20 boleo Jeg har problemer med række 9 og 10 kan ikke se hvad jeg skal mellem vifterne
07.08.2021 - 02:51:
DROPS Design answered:
Hei Annette. Du hekler som tidligere etter diagrammene ( A.1 + A.2 + A.three (1-2 eller 3 ganger i bredden) og avslutt med A.four. I rekke 9 hekles det two luftmasker og 1 stav i slutten av diagram A.2 og du starter med ane stav og ii luftmasker av diagram A.3. Du avslutter A.3 med two luftmasker og 1 stav (om du hekler str. Fifty/XL – XXL/XXXL skal A.3 gjenta i eller ii ganger). I rad 10 avslutter du med A.2 med 2 luftmasker og ane stav og begynner A.3 med 2 luftmasker og avslutter A.iii med 1 stav (om du hekler str. L/XL – XXL/XXXL skal A.3 gjenta 1 eller ii ganger). mvh DROPS design
16.08.2021 - 08:13:
![]() Petra wrote:
Petra wrote:
Mijn vraag: Ik ben zojuist gestart met het vierkanten vest in Drops cotton Merino maat South/M Ik moest 163 lossen opzetten, maar de eerste toer heeft 138 steken. Wat doe ik met de overige lossen? Bovendien staat bij de beschrijving A.4a 'over de volgende 19 lossen', terwijl er in het telpatroon slechts sixteen stokjes staan vermeld. Dit laatste klopt dan weer wel met de = 138 steken in de beschrijving. Kunt u mij uitleg geven over beide problems?
27.07.2021 - xiii:42:
DROPS Design answered:
Dag Petra,
Excuses voor het late antwoord. Om je beter te kunnen helpen is het handig om te weten welk patroon je precies maakt en in welke maat. Is het mogelijk om je vraag bij het betreffende patroon te posten?
26.10.2021 - eleven:28:
![]() Annika Linde wrote:
Annika Linde wrote:
Hej ! Jag är nybörjare och skulle väldigt gärna virka denna hatt men förstår verkligen inte den😥. Är det möjligt att få någon hjälp personligen ? Har virkat 2 andra hattar solhattar som blev väldigt bra . Men denna med öglor och diagram . Förstår inte alls tyvärr . Men vill virka denne till min human being . Tacksam för hjälp . Med vänlig hälsning, Annika Linde
10.07.2021 - 15:xi:
DROPS Blueprint answered:
Hej Annika, skriv hvad du vil have hjælp med inde under kommentarer inde på selve mönsteret, så ved vi hvilket mönster og hvad vi skal skrive tydeligere til dig :)
fourteen.07.2021 - xi:24:
![]() Manufactory LØKKE wrote:
Manufactory LØKKE wrote:
SKAL ALLE DROPSMØNSTER HA DISSE DIAGRAMMENE? JEG ER EN ERFAREN HEKLER,MEN DETTE BLIR FOR DUMT. FORSTÅR DET,MEN DET ER VELDIG TIDKREVENDE. HVORDAN KAN Half dozen VITE HVILKET DIAGRAM Half-dozen FÅR FØR VI HAR KJØPT DET? KJØRTE FRA SUNNDALSØRA TIL TRONDHEIM TIL EN BUTIKK MED ERFARNE FOLK,MEN DE VI FORSTOD DET HELLER IKKE. HAR ALLE MØNSTRENE DISSE DIAGRAMMENE?
04.07.2021 - 15:46:
DROPS Design answered:
Hei Mill. Dette er en generell forklaring på hvordan hekle etter diagram. Hver enkel oppskrift har forskjellige diagrammer. Alle våre oppskrifter er GRATIS og du ser diagrammene under den aktuelle oppskriften du skal hekle, om det er diagram. Om du finner en oppskrift du ønsker å hekle, men har problemer med å skjønne diagrammet (ene), kan du fint legge et spørsmål under selve oppskriften, så skal six hjelpe deg så godt vi kan. mvh DROPS blueprint
05.07.2021 - 08:02:
Exit a comment or question to this lesson
Your electronic mail address will not exist published. Required fields are marked *.
dalgleishmandearer.blogspot.com
Source: https://www.garnstudio.com/lesson.php?id=69&cid=19